
This is how you justify all those art supplies you bought!
The best gifts that are given will check three boxes: beautiful, useful, and thoughtful. If you can check all three, you name is going to go down in the history of best presents ever given. Two out of the three is still amazing. One out of the three is usually where most gifts land, and they’re still great. Hey, it’s the thought that counts, right?
One way that I justify all my art supplies is I use them to make personalized gifts. For one, they’re a lot more meaningful and unique, and for two (and probably highest on my husband’s list of “why I’m okay with my wife’s weird obsessions” is that it can actually save us money. Instead of a bland or useless gift they may or might not want, they can have something pretty that also might come in handy. Notebooks are always, always useful.
They’re super easy to make, to boot. So pair it with a little birthday money and a candy bar and boom, you’ve got something thoughtful, useful, and beautiful to give.
Plus, this is so easy and enjoyable to make. It’s like taking a bubble bath while eating an orange roll and listening to Celtic music. Which I hope you will try very soon.
Alright, let’s get this party started!
What you will need (with links if you need them):
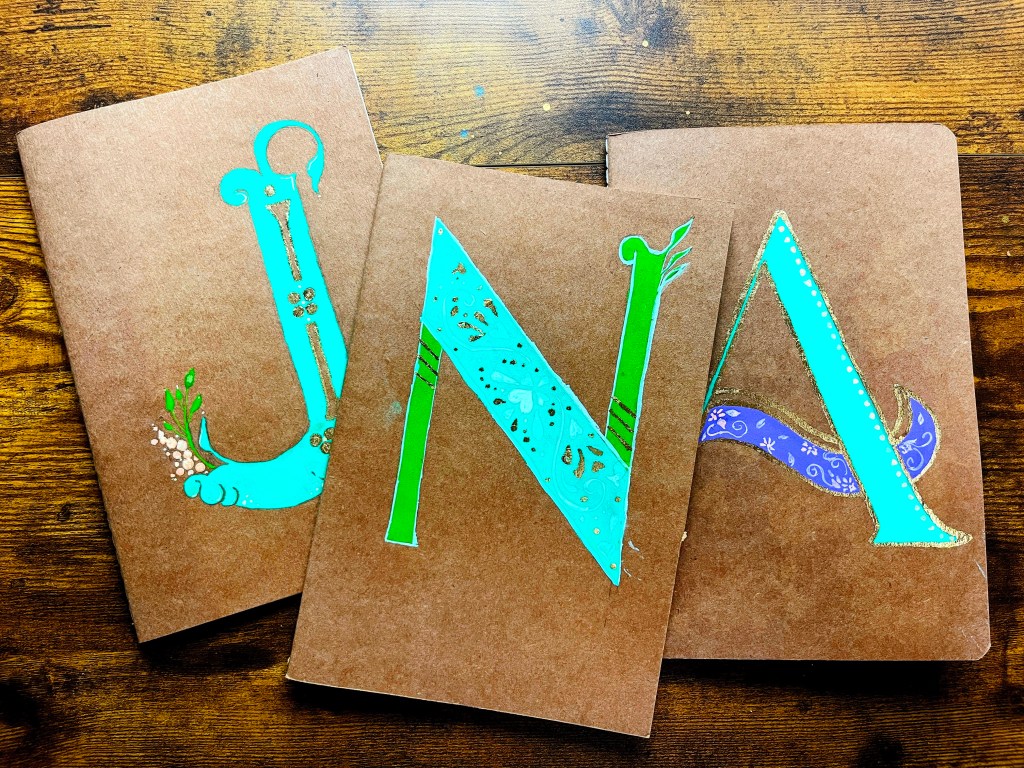
- Printed page of the letter you want to create
- A pencil (please, dump the junky ones from the dentist and get these ones instead)
- Blank notebook (I got these ones off of Amazon)
- Gouache* or acrylic paint (Note: gouache gives excellent color and coverage, but you do need to spray a fixative on it so it doesn’t smear if it gets wet.)
- Gold foil kit
- Small round brush, size 6 or 8, good for detailing
- Soft medium sized brush for removing gold foil – you can use any old, soft brush you have, or get one specifically made for gilding like this one.
Buying all this stuff for just one notebook might be a little overkill unless you have a lot of the supplies already – but I’ll tell you now that once you buy this stuff it lasts FOREVER! I’ve been using the same gold foil kit for five years, the same gouache for at least two, and I’ve made so many notebooks now that I’ve had to buy another box to keep fueling the fun.
Step One: The Setup
We need to transfer the image of the letter to the notebook, and to do this, we’re going to use a resourceful “carbon paper technique.” Take the piece of paper that you printed the letter on, and flip it over face down on top of your paper. Grab your pencil, and using the side of the lead, color over the letter until there is a generous amount of graphite covering the image. You don’t need to cover the whole paper – just where the letter is.
Once the back of the paper is covered, flip your paper over so you can see the letter again. Place it on top of the notebook and line it up so the letter will be centered on the cover. I’ll sometimes fold or crease the paper to help me center it and keep it in place.
Once you’ve got it centered and secure, use the point of the pencil to trace along the lines on the letter. You’ll want to press firmly. DON”T PEEK! I hate to say it, but patience really is a virtue here. If you take it off too early, you risk the lines not matching up when you replace the stencil. Finish tracing the letter, and then remove the printer paper.
Step Two: Give it a Splash of Color
Using your pencil marks as a guide, paint on some color with your gouache or acrylic paint. I like to paint the body of the shapes with one color, and then paint the outline with either a contrasting color or leave it blank so I can embellish it with gold. Once it’s dry, use contrasting colors to add little leaves, dots, or vines for some fun details. Let it dry completely. It shouldn’t take too long.
Step Three: Make it Sparkly!
THIS PART IS SOOO FUUNNNN! If you haven’t done this before, I sure hope you get to, because I don’t know if you’ve lived until you’ve uncovered a beautiful art treasure. You’ll feel instant Indiana Jones and the Last Crusade vibes, I promise!
We want to protect our round brush from the adhesive glue we’ll be painting with. To do that, get a little soap and massage it onto the bristles, then wipe it just clean enough that there isn’t any drippy residue and the bristles look clean and smooth. I’ll usually use foaming hand soap and then just use my fingers to wipe the bristles into shape.
Next, open up the bottle of adhesive. I’ll look like runny glue inside. Using your brush, paint the areas that you want to be golden, using care to cover the areas generously. Be careful to have clean edges and clear details, but don’t go too skimpy with the glue. Too little will mean that the gold foil won’t stick. It’s going to take a bit longer for this step to dry, so once you finish, put it in a safe place and go have a dance party or two.
Once the glue has turned clear and dark, you know it will be ready for the gold foil. Grab your packet of gold foil that comes with the kid, pull out a sheet, and lay it down over the areas with glue. if you miss any areas, grab some more foil or tear off an area you don’t need and get it all covered. I like to gently pat it with my fingers to ensure that the foil and glue are fully in contact. Then use your soft gilding brush and gently rub in circles to remove the excess foil. Cue the happy goosebumps!!!
Step Four: Finishing Touches
At this point you can add a few details if you want to. Write a great poem or thought on the back or inside cover. Put a few stickers or vintage stamps on some of the pages for visual interest. Insert a bookmark, dollar bill, picture, gift card, or stick figure self portrait. Et voila! You have a beautiful notebook you made by your very own selfie! Now – turn on some Celtic music, grab an orange roll and turn on a steamy bubble bath, because you earned it!
Do you have any questions? Sometimes I get ahead of myself and don’t explain things well, so leave me a comment here and I’ll answer it the best I can!


Leave a comment